Thursday, June 30, 2011

Computer Troubles and Another Vacay!

My computer is refusing to run for more than 5 minutes at a time this morning.  It started last night when I went to write today's blog post about this dessert that I made yesterday...


And continued into this morning.  Major Bummer!  (Maj. Bummer *salute* HIMYM anyone?)  So today will have to be quick.  I'm headed out of town for a week with Eric and his family tomorrow - have I mentioned this?  This is why I've been dying of busy the last few days and crazily trying to finish up our projects.  We're headed here...


Rocky Mountain National Park, CO.  GORGEOUS!  We are going to enjoy a week of hiking and lounging and visiting famous *albeit creepy* places like this...

Recognize this one??  It's the Stanley, of "The Shining" fame.  It's a bit creepy to visit at night.  The first time we visited Eric and I crept upstairs (where only guests are allowed) and took pictures in the hallways and rode the elevator.  C'mon, we had to.  We may have taken a few crazy (read: silly looking and ridiculous) videos whispering "red rum!"  We're goofy.  Also, I've never been able to watch the movie all the way through in one sitting.  I'm a big fat chicken. 

I'm also hoping to do this while we're there...


We are getting excited!  A few friends will be staying here with Ted... I tried and tried to convince Eric to bring him, but he was convinced Ted would be eaten by a bear, lol.  Unlikely, but anything to put my hubby's mind at ease. ;)  I hope you're all enjoying your summer.  Any fun trips planned??  Tell me all about 'em!  I like to live vicariously through other people's travel.  Have a very happy Thursday, friends!

Wednesday, June 29, 2011

Curtain Time, and Adventures in Extreme Puddling!

So, I FINALLY purchased updated curtains yesterday.  Is this my little project I hinted at near the end of yesterday's post??  No.  That one involved spray paint and the wind blew like heck here yesterday, so that was a no go.  But it was still 114 degrees - it was like being in a windy oven. *insert whining here*

I've been wanting to purchase new curtains for a while, but they are soooo expensive!!  It's expensive to buy them, make then, look at them, wish for them... everything about curtains is expensive.  Boo.  I had looked at IKEA for a while (this was about 6ish months ago?), but couldn't really find anything that didn't remind me of a dormitory (or didn't need extensive altering, sewing makes me swear).  I mostly found panels like this:
Graphic? Yes.  In a good way for my home? No.  I also found panels like this...
Nice neutral color?  Yes.  But those loops at the top, I've tried to love them, but I jut can't do it, sorry loopy thingys.  I also found panels like this...
I really like the print, but the grommets just aren't my style.  I couldn't figure out why until a dear friend pointed out that they may remind me of a shower curtain (you're a genius, Meaghan!).  Bingo.  No shower curtains for this living room!   So, what to do?

I finally ran across a set of curtains I liked in a friend's home recently, and she mentioned they were from IKEA.  I practically RAN there to look at them.  I really liked them, a LOT - but I am indecisive, especially about things that are going to be so permanent in my home.  You don't just up and replace window treatments every year like you can do with pillows or throws or something less expensive.  I decided to wait and shop around, my usual M.O.  This was April-ish, I think?  Enter the end of the school year (muy muy muy grading!), my sister's graduation, two weekend trips, 3 family birthdays, Eric's and my anniversary, and a de-popcorning project!  Needless to say, when I finally got a free hour yesterday evening to sneak off to IKEA,  I was thrilled.  When I finally got to the curtain section, I found the RITVA design from my friend's home, seen here:

Nice, right?  They're a little plain, but the texture is great and I can add some trim myself, if I want to.  Plus, they're $20 for a set of two 57"x98" panels!  Wahoo!  Only problem is??  They are Completely. Out. Of. Stock. In the color I want.  *tears begin to flow* <-not really, but I was crying on the inside...

They have the chocolate brown color (way too dark) and a maroon (SO not happening again - our current curtains are wine red), but no nice, neutral tan.  WHY did I wait so long??  And then a sales lady comes to the rescue.  She points out that I could buy the extra long panels (like 3 feet extra long!), and just hem them.  Lazy me is annoyed at the extra work, but frugal me (the one who waited so long) is excited.  The extra long panels are $30 for two, but still a great deal!  As I'm walking over to the extra long panels, led by a shining light from heaven, I stumble across these...

Oh, hey pretty blue curtains, how you doin'?  I knew I liked the color, but wasn't sold on the design.  Normally I would take pictures of both the tan panels and the blue panels and go home to think it over.  But NO, I was not going to make that mistake AGAIN!  So, I did what any good shopper does.  I bought both sets (gave my husband a heart attack when he saw the final amount, but reassured him I'd be returning at least half of the bill) and saved the receipt.  I also bought  double curtain rod, as the current curtains we have are "black out" and we'll probably need an extra sheer to give us the same light-blocking coverage (gotta keep the 114 degrees outside and keep it below 82 inside. Yes, 82.  I told you I was frugal).  So, I took down our old curtains (here they are crumpled into a pile)...


Have I mentioned why they needed to be replaced?  It's a bit of a bunny trail, but go with me here...  Anyone out there watch Arrested Development?  If not, you should, it's best show that was ever canceled - it's only 3 seasons, go watch it.  Now.  Netflix has it on instant streaming.  Remember when Tobias is waiting to be an extra in the Blue Man Group?  Go watch this video.  This is what happened to my curtains, but with white.  From the drywall and ceiling re-vamp.  All over.  Needless to say, they need to be replaced.  And it's probably for the best, as the red was making the giant window look a little like a stage curtain.  Anyway....

I took down the curtains and replaced one side of the window with the blue and white curtains, and one side with the tan curtains...


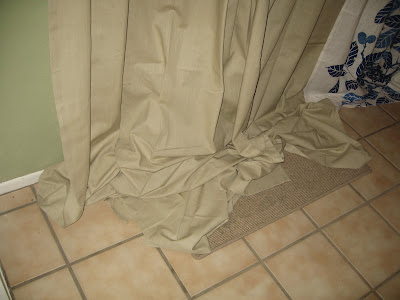
Check out the MASSIVE amount of extra fabric on the tan ones!  As a funny joke I told Eric it was on purpose and a fashion statement.  I called it Extreme Puddling...


He bought it, looking baffled by my choices, but nicely trying to be sort-of OK with it... until I started to snicker... teeheehee!  The curtain rod will be replaced by a "beefier" one, and moved MUCH closer to our ceilings.  Oy, the mistakes I made with these the first time around.  Here's a close up of each curtain.


See the nasty popcorn ceiling yet to be removed?  And see how much the rod needs to be larger and closer to the ceiling?  Here's the tan ones:


So, do you have a clear favorite?  We did.  We chose.......  the Tan!  The blue ones were pretty in the store, but in our living room they were just too much.  We had that experience before with our red curtains, and we weren't looking for a repeat.  The curtains were the first thing people looked at when they walked in the door, and while we want the curtains to add to the space, we don't want them to be the main attraction, ya know?  Here's a close up of the yummy texture...


Can you see the great woven look?  I love it.  I'm even thrilled at how the light is coming in this morning.  I may not need the double rod and black out fabric after all (another $25 worth of things to return to IKEA, hurrah!).   I'll have to hem them (lazy me is not thrilled), and I'll probably end up adding some sort of no-sew trim (crafty me is getting excited!), but all of this will have to come gradually.  Except it all has to be done by July 30, when I'm hosting a baby shower here! Sew, I'll keep you posted (get it?? lame-o joke alert!).  Meanwhile, I hung the rest of the panels just to get an idea of what things will look like...


Not bad... after I take care of the Extreme Puddling issue ;)  Ted, however, is the worlds #1 fan of Extreme puddling...


I think he'll be sad when I remove them for hemming.  Well, ladies and gents, I've got to run and bake Strawberry Shortcake for a dinner tonight, collect some items for a charity silent auction, pick up around here (did you notice the Easter basket on my table, lol!), drop off some things at Goodwill, sell some clothing at Buffalo Exchange, clean out two closets, and return the blue curtains to IKEA.  All before 4:30PM.  I'll just go fasten my super woman cape now, thankyouverymuch.  I hope you all are having a great day - I'm going to try to have a great day, and also try not to melt into a puddle in my car (another scorcher here today at 110 degrees in good old Tempe!).  Happy Wednesday, friends!

Tuesday, June 28, 2011

Ross: the good, the bad, and the ugly

Ross is one of my favorite and least favorite places to visit all in one.  I have found a few of my most favorite pieces in my home from Ross, and I have spent hours sifting through kitsch and junk to find nothing.  It really all depends on the day.  Today was a lovely day at Ross.  While I didn't come home with anything, I decided to take a few picture of the lovlies, the uglies, and the just-plain-weird.

**Disclaimer**  Everyone has different taste - I'm expressing mine and please don't be offended if I don't like something that just happens to be your favorite piece.

Here we have the first "good," a set of white foo dogs for the TINY price of $26 for the pair:
Adorable, no??  They would be perfect as bookends!  I WISH they could have come home with me. 

And now it's "ugly" counterpart...
Friends don't let friends buy mosaic giraffes.  Who makes this??

Next we have this AMAZING blown glass bottle with a sisal rope wound around the neck - delish!
This would look lovely in my living room - maybe another day.

This little number isn't necessarily "ugly," just... "blah."  There's nothing original about it...
I think I'd opt for something with a bit more originality - something that doesn't look like I'd find it in a model home. 

Here we have a great garden stool, perfect to accompany a couch as a side table

Aren't they cute?  I'll take both - please and thank you.

And now another "not-so-lovely," shall we say...
Again, it's not "ugly," it's just been done before.  I could walk into any model home and find one just like this filled with silk plants.  If you have a choice of containers, choose something original, if you can. 

I had a fabulous time digging around the home department today, too bad nothing jumped into my cart.  Of course, the mood was a bit dampened by the SWELTERING heat.  It was 115 degrees today!!  I can't wait to get out of town again.  Stick a fork in me - I'm done!  Despite the ridiculous heat, I'm off this morning to complete another little mini-project to be shared tomorrow.  Have a lovely and happy Tuesday, friends!

Monday, June 27, 2011

How to remove your popcorn ceilings

We are FINALLY finished!!  In the process, I completely cleaned my house form top to bottom (hooray!), and got rid of two carloads of junk - yay for Goodwill!  Now, it's time to document the process so any of you people who are fool ambitious enough to tackle this project will have some idea where to start.

We were fortunate enough to only have popcorn in two of our three bedrooms and both living areas.  While this may sound like a LOT of popcorn (736 square feet, to be exact), it could have been much worse, as our total square footage is around 1300.  We knew we wouldn't have time or perhaps even the resources to tackle the whole house at once, we started with the two bedrooms. 

IMPORTANT!!  In case you didn't know, some popcorn ceilings contain asbestos, a very hazardous material that is known to cause lung cancer.  You should NEVER attempt to remove your ceilings without first testing for asbestos!!

We took the necessary precautions in case we did have asbestos, even though we were very certain that we didn't.  This included fully tenting the room, wearing masks at all times, and cleaning thoroughly. 

We first masked the room much as if we were going to paint the ceilings.  We then attached plastic drop cloths all the way around the room, and laid more on the floor taping them all together. 

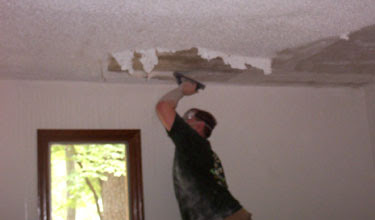
Stripping the popcorn is actually the easy part of the job.  To do it, you'll need some sort of water sprayer, and a putty knife.  We used an empty bug sprayer (it had never before been filled with pesticide - we figured it was best not to mix chemicals =)) and a 6 inch putty knife.  This part of the process will either be SUPER easy or a bit harder, depending on whether your popcorn has been painted.  If it's not been painted, the water will absorb quickly and you can scrape in a matter of moments.  If you do have paint on your ceilings, you may need more water and you will certainly have to wait longer.  The ceilings should scrape easily when they are thoroughly soaked.


Underneath the popcorn will normally be bare sheets of drywall.  You do NOT want to wet these, nor do you want to damage them, otherwise you'll have to cut out those bits and patch them.   So, scrape carefully!

Once all of the popcorn has been removed (it took less than two hours for our 275 square feet), remove all of the drop cloths and all of the popcorn and dispose of them.  You really can't be too careful with this junk, it's awful.  And even if it doesn't have asbestos in it, it's messy as heck and you'd do better to get rid of it right away.  Now you get to re-mask the room and hang new drop cloths.  You needn't be as thorough this time, as you're just protecting your walls and carpet from the texture you'll apply to the ceiling. Here we are with the naked drywall showing through, and new masking hung (the drop cloths look used b/c I saved them from our last house painting projects - I'm cheap!)


 Speaking of which, it's time to decide what you want to apply to your ceiling.  We originally wanted a "skip trowel" finish.  A skip trowel looks like this...


You're meant to spread a thin layer of topping joint compound...
...onto the edge of the trowel and artfully drag it across the ceiling to achieve a texture that ends up looking like a flatter version of stucco.  Like this:


The length of the handle on the trowel is meant to cause it to "skip" a little as it slides over the drywall.  Hence the little divots.  However, what you don't know is that getting the texture to look right is next to IMPOSSIBLE.  We spent no less than 3 days trying to perfect it and tell ourselves that it actually looked good.  Here's a glimpse:


As you can see, it ended up looking more thick, like outdoor stucco.  This can be because the joint compound is too thick (you didn't add enough water to the mix), but even when we made it runnier, we had the same problem.  On Tuesday morning, when we were hoping to start painting, we decided it was a no go.  =(  

Since we have an orange peel texture on all of the other walls in our home...


...we figured we would just spray this onto the ceilings in an effort to maintain continuity.  You can buy orange peel texture in a can (VERY $$$ per square foot), or you can rent a hopper and a generator...


...and spray on the texture (which is just the topping joint compound mixed with air).  We opted for the cheaper option, which for our square footage was the hopper.  In order to do this, your ceilings need to be completely flat, as the orange peel isn't very forgiving with lumps and bumps (as much as it looks like it should be!).  In order to do this, you must sand down what was to be the skip trowel texture, and fill in the gaps with more topping joint compound using your 6 inch putty knife.  UGH!!  

**Make sure when you are sanding a ceiling that you NEVER sand all the way down to the drywall.  If you rip the drywall paper, it's no longer usable, and you'll have to patch it (read: more work with your arms over your head, as if you hadn't done enough already, thankyouverymuch).   

Here is where I enlisted the help of a good friend in what turned out to be four delirious hours atop two ladders in 90 plus degree heat (Tovah, you are a ROCK STAR!).  We were discouraged that we couldn't get the finish exactly flat, but figured we could sand the rest of it the next day.  But after we literally hosed each other down because we were so crusty and sweaty and miserable cleaned up a bit, we looked back at the ceiling to discover that the texture was LOVELY as it was!  WIN!  I LOVE happy accidents like that!  Eric got home, took one look at it, and loved it too.  It looked somewhat like this, only white (ours was VERY difficult to get a good picture of)


Nice, huh?? Next step: sand and prep for paint.  You want to make sure that any little "boogers" are eliminated because sharp edges and little "hangers on" to the ceiling will be glaringly obvious with paint.  I recommend 80 grit sandpaper.  It was tough enough to get the job done without obviously scraping the texture.  Are you TOTALLY bored of this tutorial yet?  I warned you at the start that this project was time consuming, dirty and boring blog material - I'm just saying... you knew this going into it. :p

Next, make sure all of your edges where the wall meets the ceiling are nice and neat.  If not, just use your putty knife and possibly some sandpaper to clean things up.  We knew we would be painting our walls shortly, so we pulled down the drop cloths and let them just cover the carpet, hoping to improve circulation in the rooms (did I mention it's been bout 112/113-ish this last TWO WEEKS?! And that the drop cloths were blocking the AC vents?? No exaggeration there, people!).  We just watched for drips as we went along and painted the crap outta those rooms!  We went with a nice white color in  Behr paint.  I'd give you the name, but we had it matched to the Valspar on our kitchen cabinets, because we liked the color so much, but had coupons for Behr paint (told you we were cheapos!).

This is how we looked before paint...

And after paint...
Ok, so even I admit it's hard to see the difference after paint.  But, you gotta paint it!  I think a close up before and after will show you just how far we came.  So...

BEFORE:

AFTER:

I'm so pleased with the transformation!  I know it's not much to blogland, but it's a BIG deal to us, and it adds a couple thousand dollars in value to our home, woot!  Did I mention that we had a company come in and quote us $3500 for the whole project?  We spent $157.  BOOM!  Now, granted - it took FOREVER, and we're only about 1/3 done with removing all of the popcorn from our house (square footage wise), but we love us some sweat equity!  And even if it ends up costing us triple this amount to finish, it's still cheaper than hiring professionals.  Plus I get to skip the gym - texturing is a work out! While the payoff in looks isn't as amazing at my DIY kitchen remodel from last summer, it makes me feel excited.  It's like we live in a place that wasn't built in 1976.  

So, are you up for it, fellow haters of popcorn??  It's a challenge, to be sure, but the payoff (literally - when you sell your home) is totally worth it.  The best advice I can give is to NOT attempt this project in the middle of the summer in AZ, and to take frozen yogurt breaks often.  Nothing makes you feel as refreshed as an ice cold glass of water and....

Mmmmmmmm!  Come to think of it, maybe I need a little "hooray-I-finished-my-project" reward.  I'm off to get some FroYo; happy Monday, friends! 

Friday, June 24, 2011

The easiest Salmon recipe ever

We are less than 12 hours away from finishing the ceilings!  Only one coat of paint in one room left!  I've officially gotten my main living areas back, and they'll be cleaned shortly *sigh of relief* Monday is the day I'll share the whole process - buckle up. 

Last night, the house was at the height of it's craziness and I think since I couldn't clean, my other domestic instincts kicked into overdrive.  I decided it was time to make baked salmon for dinner. I really don't like salmon, but Eric LOVES it, and I can stand it once in a while.  I knew I wanted to use Dijon mustard as a flavoring, and I knew I wanted it nice and crispy, so I compiled some ingredients because my computer charger was lost in the crazy that was my living room (normally I'd just Google a recipe because I'm creative like that). 

Salt & Pepper
12oz salmon fillet
2 tablespoons of butter (I used 3 and it was too much)
3 tablespoons Italian bread crumbs
Dijon mustard
shallow pan covered in foil (for easy clean up)

1) Preheat oven to 400

2) Place salmon, skin side down, on the foil.  Spread a thin layer of Dijon mustard over the entire fillet.

3) Season the fillet with salt and pepper

4) Sprinkle fillet with bread crumbs

5) Drizzle with melted butter

6) Pop that fishy into the over for about 15 minutes or until it cuts easily with a fork (rule for all fish).

7) Serve!

And here's my little table setup.  Obviously I served it with a nice white wine, a gorgeous salad with veggies I grew organically myself, and homemade bread.  SIKE!!  (<- I am single-handedly bringing this word back, people!) Who do you think I am??  I served almost stale bread crostini (waste not, want not!), and baby carrots.  Because that's what I had.  And we had red wine.  Because we like it better.  So there.

And yes, we are both eating at the butt-end of the table because the rest is covered in supplies.  I bet you can catch a glimpse of my little ceramic elephant, some painting supplies, and an oven mit.  Yep, it's how we roll. 

Give this recipe a try - it couldn't be easier, and the prep is seriously 5 minutes.  And even I, who dislike salmon, found it pretty enjoyable.  With that, I've got to go paint a ceiling.  Have an amazing Friday, friends!  The weekend is here!

Thursday, June 23, 2011

Why I could not decorate without calculus

First off, let me say, I am SO CLOSE to being finished with my ceilings!  All I have left to do today is paint one room, and patch and sand the other (it'll be painted tomorrow).  Yesterday I managed to reorganize the crap junk things sitting in my living room so that they take up less space.  And I bagged and stored both of our twin mattresses and box springs from the guest bedroom.  Did you know that U-haul sells mattress storage bags for $2.95?  Home Depot and Lowe's each wanted over $10 apiece.  Keep this in mind the next time you want to store something! 

I also succeeded in selling our old nasty chair on Craigslist.  It was something my husband had had since he was in college (anyone else's husband attached to yucky college furniture??), and he insisted we keep it because it was "sooooooo  comfortable."  Except, he never sat on it, and it became the dropping place for his briefcase and bike helmet (he rides his bike to his professional desk job b/c we're awesome and green like that).  So, he finally agreed to let me sell it on Craigslist.  I listed four things two days ago: a desk, a dining table and chairs, a couch with  slipcover, and the ugly nostalgic chair.  Only thing that sold immediately?  You guessed it... the ugly chair. 

**Quick Craigslist question to all of you pros out there.  When I was searching for my couch, I swear I saw the exact same postings pop up over and over, sometimes posted only hours apart.  But when I went to re-post my couch a day or so after the original posting, it told me I had to delete the first post because they don't want identical postings cropping up over and over again.  How can others get away with this?  Am I really going to have to delete and re-post my ad everyday?  Any and all advice on the topic is needed/appreciated!!**

I also succeeded in finishing my make over of the little ceramic elephant!  It was a bit of a struggle because as you know, my house is a horrible mess, and I couldn't find any newspaper to cover my project table outdoors to protect it from the spray paint.  I went fishing for something else I could use in a pinch and came across a pile of my old exams from college.  I leafed through them, and decided that I would never need them again, so here's what I did with them:


I call it "calculus collage plus plastic bag."  Can you say "ghetto?!" And have I ever once used any of the material from the 12 courses I had to take beyond calculus since graduating?  No.  But the exams are great for scratch paper!  And yes, that is blue painters tape holding it all together.  I told you my house was dirty and disorganized!  Here's a close up of one of the pages:
In case you can't read the problem... "Two ships start at the same point at noon.  One goes south at 15km/hr, and the other goes northeast at 20km/hr.  How fast is the rate of distance between them changing at 4PM?"  Answer: 32.392347 km/hr.  BOOM!  I wish I was still this smart.  (If you really are THAT big of a nerd, click on the picture to view it in its larger form and see all of my picture perfect work, if-I-do-say-so-myself.  I have to be good at something, right?)  Oh well, back to spray painting an elephant...

He looked like this when I bought him  for $1 at a thrift store:


Love that hand-painted, artisan look, no? ;)

After three coats(because I messed up coat #2) of glossy white Krylon, my little Goodwill score looks like this:


Isn't he adorable??  I just love my white little pachyderm.  He will someday live in a charming little vignette that I have yet to assemble - I blame it on my ceilings (what am I going to blame everything on when I'm done?!). 

So, there you have it.  If your child ever questions why higher math is necessary (and it IS! I will always defend this: it teaches you how to THINK, people!), you can tell them that it is valuable for almost every career, including interior design.  Happy Thursday, friends!